Thursday, August 29, 2013

Chipotle Chicken Kebabs with Avocado Cream Sauce


Right now I am kicking myself for not making these Chipotle Chicken Kebabs with Avocado Cream Sauce earlier in the summer. I immediately bookmarked the recipe when I saw it on Annie's website way back in June, but just got around to making it this past weekend. Why did I have to wait until the end of grilling season to try this recipe for the first time? To be fair, we don't have a grill, or any outside space for that matter, at our apartment. However, the chicken can also be grilled on an indoor grilling pan. I can now see myself making this meal all-year round.

The chicken itself is coated in a simple marinade- mainly lime juice, garlic, chipotle and a number of spices. The marinade provides great flavor, but isn't overly spicy. Even my boyfriend, who tends to shy away from foods with a lot of heat, loved this chicken. I also think it would be good to shred this chicken and add it to a homemade burrito or taquito. Don't skip the avocado cream sauce either- it is one of the best parts of the meal!

Chipoltle Chicken Kebabs with Avocado Cream Sauce
Recipe from Annie's Eats

For the chicken:
Juice of 2 limes
1/2 cup vegetable oil
 1 tsp salt
3/4 tsp chili powder
3/4 tsp paprika
1/2 tsp cumin
1/4 tsp cayenne pepper
2 cloves garlic, minced
1 tbsp brown sugar
1 chipotle in adobo, seeded and minced
2 lbs chicken breasts, cut into 2 inch pieces
Fresh cilantro, minced, for serving

For the avocado cream sauce:
1 avocado, split and pitted
1/2 cup low-fat plain greek yogurt
1 clove garlic, minced
Juice of 1 lime
Salt and pepper, to taste

In a medium bowl, combine the lime juice, vegetable oil, garlic, brown sugar and chipotle. Whisk until combined. Add the chicken pieces to the marinade and toss until well coated. Cover the bowl with plastic wrap and refrigerate for 30-60 minutes.

Heat a grill to medium-high heat and oil the grates. When the chicken is ready, thread the pieces onto skewers for grilling. If using wooden skewers, be sure to sure them first to prevent burning. Place the chicken kebabs on the grill and let cool until all sides are slightly browned. The internal temperature should read 160 degrees F when ready. Remove the chicken from the grill and let rest for 5-10 minutes. Sprinkle with fresh cilantro.

To make the sauce, combine the avocado, yogurt, garlic and lime juice in a blender. Process until smooth and creamy. Season to taste with salt and pepper. Serve with the chicken kebabs for dipping.

Tuesday, August 27, 2013

Thick and Chewy Toffee Brownies


The inspiration to make these thick and chewy toffee brownies came from Dan. Last month he spotted a bag of toffee bits at the supermarket and asked if I would bake something with them. I happily agreed and put the bag of toffee bits into my shopping cart. Believe it or not, Dan only eats a small percentage of everything I bake and cook. He is one of the pickiest eaters I know. You know how chocolate and peanut butter is my favorite combination ever? Well, he doesn't like peanut butter. He insists that I frost a few of my favorite dark chocolate peanut butter cupcakes with plain vanilla buttercream just for him. He also won't go near a number of vegetables and anything white or creamy (cream cheese, mozzarella cheese or ranch dressing, just to name a few). 

Although I will never understand his eating habits, I always enjoy making something I know he will eat and truly enjoy. And these toffee brownies satisfy that criteria. Rich, thick, and most importantly, boyfriend approved!

Thick and Chewy Toffee Brownies
Recipe from Handle the Heat (originally adapted from Bon Appetit Desserts)

1 cup semi-sweet chocolate chips
1 1/2 sticks  (3/4 cup) unsalted butter, cut into pieces
4 oz. unsweetened chocolate, chopped
1 1/2 cups granulated sugar
4 large eggs
3/4 cup all-purpose flour
1 cup toffee bits

Preheat the oven to 350 degrees F. Line an 8x8 inch baking pan with aluminum foil and spray with non-stick cooking spray. Set aside.

In a large microwave-safe bowl, combine the chocolate chips, butter and unsweetened chocolate. Heat in the microwave for 1 minute and then stir. Continue heating in 30 second intervals, stirring between each interval, until the mixture is melted and smooth. Be careful not to burn the chocolate. Remove from the microwave and allow the mixture to cool slightly.

Add the granulated sugar and stir until combine. Add the eggs, one at a time, mixing until incorporated after each addition. Stir in the flour and then the toffee bits, mixing until just combine. Pour the batter into the prepared baking pan. Bake for about 35-40 minutes or until an inserted toothpick comes out with just a few moist crumbs. Allow the brownies to cool completely on a cooling rack.

Sunday, August 25, 2013

Chocolate Covered Strawberry Cupcakes


Happy Monday! Hope you all had a nice and relaxing weekend. My boyfriend and I spent most of the weekend dog-sitting at my parents' house. Luckily Remy was pretty well-behaved and did not spend the night barking as she has during previous stays. Side note- Remy always hides behind the toilet whenever my boyfriend is around. It is pretty hilarious, especially since my boyfriend really likes Remy. Anyways, being at my parents' house was also the perfect excuse to make a mess in a kitchen other than my own. I am really good at making messes when I bake. 

The idea of make these Chocolate Covered Strawberry Cupcakes has been in my head for a really long time now. I could not stop thinking about them so this past weekend I  finally made them happen.  The cupcakes themselves have fresh strawberries in the batter, are dipped in rich chocolate ganache and   are  topped with a silky smooth strawberry Swiss meringue buttercream. Sounds pretty amazing right? If the frosting does not come together right away, just be patient. It might take quite a bit of time for the frosting to become thick and smooth. Do not give up! Finally, I topped these cupcakes with more fresh strawberries dipped in the extra chocolate ganache. Enjoy!

Chocolate Covered Strawberry Cupcakes
Cupcake and frosting recipes from Martha Stewart's Cupcakes, Ganache recipe from Georgetown Cupcakes

2 1/4 cups all-purpose flour
1/2 cup cake flour
1 tbsp baking powder
1 tsp salt
2 sticks (1 cup) unsalted butter, at room temperature
2 1/4 cups granulated sugar
1 1/2 tsp vanilla extract
3 large eggs + 1 large egg white
1 cup milk
2 1/2 fresh strawberries, finely chopped

Frosting:
1 1/2 cups fresh strawberries, rinsed, hulled and coarsely chopped
4 large egg whites
1 1/4 cup granulated sugar
3 sticks (1 1/2 cups) unsalted butter, at room temperature

Ganache:
1 cup semi-sweet chocolate chips
1/2 cup heavy cream

Fresh strawberries, halved, for garnish

Preheat the oven to 350 degrees F. Line cupcake pans with paper liners and set aside. In a large bowl, whisk together the all-purpose flour, cake flour, baking powder and salt. Set aside.

In the bowl of an electric mixer, combine the butter, granulated sugar, and vanilla extract. With the mixer on medium-high speed, beat until light and fluffy, about 3 minutes. Add the eggs and egg white, one at at time, beating until well incorporated after each addition. Scrape down the sides of the bowl as necessary. With the mixer on low speed, slowly add the dry ingredients in two additions alternating with the milk, mixing until just incorporated after each addition. Turn off the mixer and gently fold in the strawberries with a rubber spatula.

Divide the cupcake batter between the paper liners, filling each about 3/4 full. Bake for about 25-28 minutes or until an inserted toothpick comes out lean. Rotate the pans halfway through baking. Allow to cool for a few minutes in the pans before transferring to a wire rack to cool completely.

To make the frosting, place the strawberries in a blender and puree until completely smooth. In a heatproof bowl set over a pot of simmering water, combine the egg whites and sugar. Heat the mixture until it reaches 160 degrees F, whisking frequently. Transfer the mixture to the bowl of a stand mixer fitted with the whisk attachment. Beat on medium-high speed until it has cooled completely and stiff peaks form, about 8 minutes. Reduce the speed to medium and add the butter, 2 tablespoons at a time, mixing until incorporated after each addition. If the frosting is curdled, continue to beat on medium-high speed until thick and smooth, about 3-5 minutes more. Add the strawberry puree and mix until fully combined. Scrape down the sides of the bowl as necessary.

To make the ganache, combine the chocolate chips and heavy creamy in a large heat-proof bowl set above a pot of simmering water. Allow the chocolate chips to melt completely, whisking constantly as they melt. Once melted and completely smooth, remove the bowl from the heat and allow to cool for 2-3 minutes.

To assemble, take cooled cupcakes and dip into the bowl of chocolate ganache one at a time, allowing any excess to drip off. Return the cupcakes to the wire rack and allow the ganache to set. Once the glaze is set, frost the cupcakes as desired. Garnish with fresh strawberries dipped in any extra ganache.

Friday, August 23, 2013

Weekend in Chicago


This past weekend Dan and I took a quick trip to Chicago. Chicago has been on my list of cities to visit for quite a while now. Overall, the windy city did not disappoint. We arrived mid-morning and immediately headed to Wildberry Pancakes and Cafe. This place has some of the most unique pancake and french toast flavors ever. You know I had to try the Oreo s'mores pancakes- they were filling but so, so good!


Dan ordered the banana bread french toast- actual pieces of banana bread dipped in a special batter and baked to perfection.  We also ordered the cinnamon roll pancakes. I think the waiter thought I was crazy for ordering so much food for just two people. 


In the afternoon we went on an Architectural River Tour of the city. If you ever visit Chicago, I highly recommend going on this tour. There are so many different boat tours, but the Chicago Architectural Foundation's tours are definitely the best. We had a really great tour guide and learned so much about the architecture of the city's buildings. 


Before dinner we decided to stop and check out More Cupcakes. My favorite was the cookies and cream cupcake. They were also giving out free mini cupcakes for happy hour. 


When in Chicago, you must try deep dish pizza. It is a must. On Friday night we had dinner at Lou Malnati's Pizzeria, which is probably one of the most popular deep dish pizza restaurants in the city. This was my first time trying deep dish pizza and I really enjoyed it. 


The next morning we had breakfast at a cute little place called Yolk. Check out the cinnamon roll french toast that we ordered. It is an actual cinnamon roll cut into thirds and then baked. I also ordered the whole grain pancakes with bananas in an attempt to be somewhat healthy. 


Since there was a two hour wait to get to the top of the Sears Tower, we decided to check out the John Hancock Observatory instead. We were at the top within minutes. The cost is definitely worth the views of the city you get from up there. 


We also visited a few other cupcake shops throughout the weekend. Next up was Molly's Cupcakes. Although this shop was a little out the way, it was packed with people and definitely worth venturing out from the downtown area. We also visited Swirlz while we were in the area. I ordered the Nutella s'mores cupcake and the Nutella banana cupcake. Can you tell that I love Nutella? 


For dinner on Saturday night, Dan and I headed over to Davanti Enoteca. We were originally going to take a cab over to Little Italy, but decided against it at the last minute. Luckily there was another location right by our hotel. The waitress told us about the focaccia bread stuffed with cow's cheese and served with local honeycomb, one of the most popular items on the menu. Of course we had to sample it. Wow was it amazing. I really want to go back to Chicago right now and order it again. Although I was stuffed after eating too much focaccia bread, I also ordered the cacio e pepe pasta (pasta with cheese and black pepper). I highly recommend visiting Davanti Enoteca if you ever visit Chicago. 


That brings us to our last morning in Chicago. We decided to have a casual morning and spend some time walking around the city. Dan brought us to the Buckingham Memorial Fountain and the Giant Bean, two can't-miss tourist spots in the city. 


And finally after months of hearing about them, I tried a cronut, or doughssant as they are called at West Town Bakery. A combination of a donut and a croissant, these flaky breakfast treats are delicious. I tried the lavender blueberry doughssant and the chocolate rapsberry doughssant, both of which were really good. Overall, we had a really great weekend and I can't wait to visit Chicago again sometime soon. Any places we must visit on our next trip?

Thursday, August 22, 2013

Cheddar Swirl Buns


It is the end of August which means it is time for another Pass the Cookbook Club post. But seriously, how are we down to the final weeks of August? I am not quite ready to say goodbye to the summer, although I do love fall baking! This month's recipes were chosen from The Smitten Kitchen Cookbook by Deb Perelman. I love Deb's blog and was more than excited when her book was selected. Good choice Kita! At first I thought I might make Deb's S'mores Layer Cake. I have been on a huge s'mores kick all summer and this cake looks like the ultimate s'mores dessert. But in the end, I gave in to my love for cheesy carbs and made the Cheddar Swirl Buns. 


Since I was in Chicago last weekend, it has been almost two weeks since I made these Cheddar Swirl Buns. Let me tell you, it was not easy holding out on this recipe for such a long time. Every time I posted a new recipe, I wanted to share these Cheddar Swirl Buns- nothing else seemed quite as good. I loved everything about this recipe- but what is not to love about cheese + carbs? At first I was a little unsure about the onions but they seemed to almost melt into the dough and really complemented the other flavors nicely. Now tell me, do I need to make the other recipes soon too? That S'mores Layer Cake is still calling my name..


Cheddar Swirl Buns
Recipe from The Smitten Kitchen Cookbook by Deb Perelman

3 cups all-purpose flour
1 tsp salt
Pinch of black pepper
1 tbsp granulated sugar
2 1/4 tsp (1 packet) instant yeast
1 cup milk
4 tbsp butter, melted and cooled until warm, plus 1 tbsp for brushing

Filling:
1/2 cup white onion, grated
2 tsp fresh dill, minced
1 1/2 cups grated sharp cheddar cheese
1/2 tsp salt
Pinch of black pepper

Combine the all-purpose flour, salt, pepper and granulated sugar in the bowl of an electric stand mixer. 

In a separate bowl, whisk the yeast into the milk until it dissolves. Pour the yeast mixture into the bowl of the stand mixer with the dry ingredients. Mix with the paddle attachment until a shaggy ball forms. Switch to the dough hook and knead on low speed for about 6 minutes or until a slightly sticky ball has formed. Place the ball of dough into a lightly oiled bowl covered with plastic wrap. Allow the dough to rise until it has doubled in size, about 2 hours. 

To form the buns, scoop out the dough onto a well-floured surface and roll it into a 12x16 inch rectangle. In a medium bowl, combine the filling ingredients and mix until combined. Spread the filling over the dough, leaving a 1/2 inch border at the short ends. Tightly roll the dough from one short end to another, making a 12 inch log. With a sharp serrated knife, carefully cut the dough into twelve 1 inch rounds.

Line two 9 inch cake pans with parchment paper. Arrange 6 buns in each of the pans, with an even amount of space in between each. Brush the tops of the buns with melted butter. Cover the cake pans with plastic wrap and let the dough rise until doubled again, about 2 hours. When almost doubled, preheat the oven to 350 degrees F. 

Bake for 20-25 minutes or until golden brown in color and the cheese is bubbling from the center. Serve immediately.


Monday, August 19, 2013

Microwave Mug Brownie


Happy Tuesday! I hope everyone enjoyed a nice weekend. My boyfriend and I got back from Chicago late Sunday night so I didn't have time to put together this post until now. Overall we had a really great weekend- we did a lot of touristy things, like the Architectural River Tour and walking the Magnificent Mile, which were a lot of fun. We also enjoyed a lot of good food. Too much good food actually- but I will share some of the food highlights in a later post. And I am trying not to let the fact that my wallet was stolen from my bag during dinner one night ruin my overall memories of the city. That was a definite bummer.

Anyways, we are back in Boston now and ready for another week. Remember this Homemade Chocolate Syrup I made a few weeks ago? After I made it, I started putting it on everything. First I made a giant Skillet Chocolate Chip Cookie and then I made this Microwave Mug Brownie. Both were equally delicious when topped with vanilla ice cream and the chocolate syrup. This Mug Brownie was also incredibly easy to make- just combine a few ingredients in a microwavable mug and heat for a total of about 3 minutes. Such a simple and delicious way to get your brownie fix!

Microwave Mug Brownie
Recipe from Cooking Classy

2 tbsp salted butter
1/4 cup light brown sugar
1 large egg
1/4 tsp vanilla extract
2 tbsp cocoa powder, unsweetened
1/4 cup all-purpose flour
1 pinch baking powder
1 pinch salt
3 tbsp semi-sweet chocolate chips

Combine the butter and light brown sugar in a 12 oz. microwavable mug.  Heat in the microwave on high power for about 45 seconds. Remove from the microwave and mix with a fork until combined. Stir in the egg and vanilla extract. Add the cocoa powder, flour, baking powder and salt. Mix until well combined. Finally stir in the chocolate chips. Set the microwave on 50% power and cook mixture for 2-2 1/2 minutes. Cooking time will vary baed on your microwave's wattage, but be careful not to overcook the brownie. Serve with ice cream and chocolate syrup, if desired. 

Thursday, August 15, 2013

Peanut Butter Captain Crunch Cookies


It is somewhat surprising that I would never eat a bowl of sugary cereal for breakfast. There is not a dessert I wouldn't eat, but when it comes to breakfast, I prefer the healthier whole grain cereals. It is not  a bad thing-just interesting. However, when it comes to snacking, I could eat Captain Crunch all day long. Sometimes I bring a small bag to work to have for an afternoon snack, but it never makes it past mid-morning. I love Captain Crunch. A lot. And the idea to add Captain Crunch to regular peanut butter cookies has been in my mind for a while, but for some reason I just got around to making these cookies last weekend. 

I shared these cookies with some friends on Saturday night and everyone loved the extra crunch that  the Captain Crunch gave these cookies. It  takes regular peanut butter cookies to a whole new level, in the best way possible. 

Peanut Butter Captain Crunch Cookies

1/2 cup unsalted butter, at room temperature
1/2 cup granulated sugar
1/2 cup light brown sugar
3/4 cup creamy peanut butter
1 egg
1/2 tsp vanilla extract
1 1/2 cups all-purpose flour
1 tsp baking soda
1 1/2 cups Captain Crunch cereal, slightly crushed

Preheat the oven to 350 degrees F. Line two large baking sheet with parchment paper and set aside. 

In a stand mixer, beat together the butter and sugars until light and creamy, about 3-4 minutes. Add the peanut butter, egg and vanilla extract. Mix until fully incorporated after each addition. 

In a medium bowl, whisk together the flour and baking soda. With the mixer on low speed, slowly add the dry ingredients to the wet ingredients. Turn the mixer off. Add the Captain Crunch. Mix with a rubber spatula until just combined. 

Scoop the cookie dough onto the prepared baking sheets. Bake for 12-15 minutes or until the edges are set. Allow the cookies to cool on  the baking sheets for 5 minutes before transferring to a wire rack to cool completely. 

Monday, August 12, 2013

Glazed Blueberry Donut Muffins


Just when I thought I had enough good blueberry muffin recipes on my blog, I went out and found another recipe that I absolutely love. This recipe, like the other three I have posted about in the past, is completely unique and requires its own spot in the recipe index. It tastes just like a blueberry donut! I seriously love donuts, but it has been quite a while since I last pulled out my donut pan from the cabinet. After making these muffins, I might have to dig it out and make another batch of homemade donuts. With fall just around the corner, it is almost time to make these Pumpkin Spice Donuts- my favorite!

Not only do these muffins taste like donuts, but they are also dipped in a sweet glaze just like so many of my favorite donut recipes. Out of everyone that I shared them with, I think my dad was the biggest fan. After trying one muffin, he asked that I leave four more for him, even though he was only going to be home for two more days. These Glazed Blueberry Donut Muffins make the perfect breakfast or dessert- or even both in the case of my dad!

Glazed Blueberry Donut Muffins
Recipe from Cooking Classy

2 1/2 cups all-purpose flour
3/4 tsp salt
1/2 tsp baking powder
1/2 tsp baking soda
1/4 tsp ground cinnamon
1/8 tsp ground nutmeg
1/2 cup (1 stick) unsalted butter, at room temperature
3/4 cup + 2 tbsp granulated sugar
2 large eggs
1 tsp vanilla extract
2/3 cup buttermilk
1/4 cup sour cream
1 tbsp fresh lemon juice 
1 1/2 cup fresh blueberries

Glaze:
2 cups powdered sugar
2 1/2 tbsp milk
1 1/2 tbsp fresh lemon juice

Preheat the oven to 425 degrees F. Line a muffin pan with paper liners and set aside.

In a large bowl, whisk together the flour, salt, baking powder, baking soda, ground cinnamon and ground nutmeg. Set aside. 

In another large mixing bowl, combine the butter and sugar. Using an electric mixer, beat together the butter and sugar until light and creamy, about 3-4 minutes. Add the eggs, one at a time, mixing until fully incorporated after each addition. Add the vanilla.

In a liquid measuring cup, whisk together the buttermilk, sour cream and lemon juice. Add 1/3 of the flour mixture to the butter mixture and gently fold until just incorporated. Then add 1/2 of the buttermilk mixture and gently fold until just incorporated. Repeat the process, ending with the flour mixture. Gently fold the blueberries into the muffin batter. Divide the batter evenly between the muffin cups. Bake for 15-18 minutes or until an inserted toothpick comes out clean. Allow muffins to cool on a cooling rack for about 10-15 minutes.

While the muffins are cooling, combine the powdered sugar, milk and lemon juice in a small bowl. Whisk until combined. Dip the tops of the muffins in the glaze, allow the excess to drip off. Return the muffins to the cooling rack and allow to cool completely. 

Sunday, August 11, 2013

Ritz Cracker Peanut Butter Cup S'mores Bites


Saturday was National S'mores Day. Did you celebrate? To be honest, I forgot all about it until I saw a bunch of s'mores recipes pop up on blogs throughout Friday and the weekend. I couldn't go without making at least one s'mores treat. Since I didn't have a lot of extra time, I decided to bake some S'mores Bites- only three ingredients and super simple to make. However, I realized that I didn't have any graham crackers. Instead I went with Ritz Crackers. FYI- Ritz Crackers make excellent s'mores. 

Originally I thought I would melt some chocolate chips and coat the Ritz Crackers in a thin layer of melted chocolate. But then I came across a bag of Reese's Peanut Butter Cups in my freezer and the idea to include them in my s'mores was born. The only thing better than ooey-gooey s'mores is ooey-gooey peanut buttery smore's. 

Ritz Cracker Peanut Butter Cup S'mores Bites
Recipe adapted from S'mores Bites

24 Ritz Crackers
12 Reese's Peanut Butter Cups
12 large marshmallows, halved

Line a large baking sheet with aluminum foil. Align the Ritz Crackers in the center of the baking sheet. Place a marshmallow on top of each cracker, sticky side down. Place the baking sheet under the broiler for a few minutes. Do not walk away. As soon as the marshmallows turn golden brown in color, remove them from the oven. Place a Reese's Peanut Butter Cup on top of each marshmallow and press down slightly. Place another Ritz cracker on top of the Reese's. Serve immediately. 

Thursday, August 8, 2013

Butterfinger Puppy Chow


Happy Friday! Do you all have any fun plans for the weekend? I don't have too much going on but sometimes those are the best weekends. And anyways, next weekend I will be in Chicago so I definitely have a lot to look forward to and plan. If you have any recommendations for places to see or restaurants to check out, please let me know! You know I am always looking for a city's best bakery. 

I usually don't post anything on Fridays, but I was really excited to share this Butterfinger Puppychow. Up until last week, I had never tried Puppychow, or Muddy Buddies as some people call them. But maybe that was a good thing because this Butterfinger Puppychow is one of the most addictive snacks I have ever had. I had to sent the rest of the bag into work with my boyfriend so that I wouldn't eat it all. Given that I am a big-time snacker, I couldn't keep my hand out of the bag. And now I can't stop thinking about what flavor combination I should try next- any suggestions? 

Butterfinger Puppychow
Recipe from Your Cup of Cake

6 cups Rice Chex Cereal
1 cup milk chocolate melts
1/2 cup creamy peanut butter
1 tsp vanilla extract
1 1/3 cup Butterfingers, crushed

Add the Chex cereal to a large mixing bowl and set aside. In a microwave safe bowl, combine the milk chocolate melts, peanut butter and vanilla extract. Melt in the microwave for about 45 seconds. Stir with a spoon and then put the bowl back in the microwave for an additional 15 seconds. Pour the mixture over the Chex cereal and stir until evenly coated.

Dump the entire mixture into a plastic bag, add the crushed Butterfingers and shake until evenly coated.
Pour the mixture onto a cookie sheet and let cool completely.

Wednesday, August 7, 2013

Roasted Berry and Brie Salad


I can't believe that summer is almost over. It seems like just yesterday we were celebrating the 4th of July. Where does the time go? One thing is for sure, I am taking advantage of all of the fresh berries while they are still in season. I buy so many that I actually have a hard time going through them all before they go bad. I can't help it- I can't resist fresh strawberries and fresh blueberries, especially when they are on mega-sale at the supermarket. 

Earlier this summer, I made this Strawberry Spinach Salad which quickly became my favorite summer salad. But this Roasted Berry and Brie Salad has definitely given that salad a run for its money. I love that the berries are roasted in the oven, making them really juicy and full of flavor. I also love the creamy brie cheese but if you are not a fan you could also use feta or another cheese or your choice. Enjoy!

Roasted Berry and Brie Salad
Recipe from Annie's Eats (originally adapted from Williams Sonoma )

For the berries:
12 oz. strawberries, rinsed, hulled and halved lengthwise
1 cup blueberries
1 1/2 tsp extra-virgin olive oil
Pinch of granulated sugar
Salt and pepper

To serve:
5-6 cups fresh baby spinach
4 oz. brie, cut into bite-sized pieces
1/2 cup slivered almonds
Raspberry or balsamic vinaigrette

To make the roasted berries, preheat the oven to 450 degrees F. Line a large baking sheet with aluminum foil. Spread the berries in an even layer of the baking sheet. Drizzle the olive oil over the berries. Add the sugar and lightly season with salt and pepper. Gently toss to coat the berries. Spread them in an even layer once again. Bake until soft and fragrant, about 10 minutes. Remove from the oven and allow to cool slightly.

Add the baby spinach plates to serving plates. Top with pieces of brie, slivered almonds and the roasted berries. Serve with vinaigrette immediately.

Tuesday, August 6, 2013

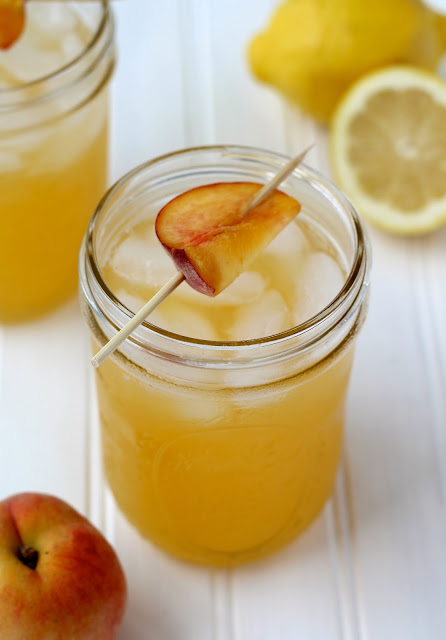
Peach Lemonade


Are you all as obsessed with Pinterest as I am? I could easily spend hours upon hours looking at that website. And I often do. I am constantly pinning new recipes to try, as well as crafting, home decor and fashion inspiration. You can follow all of my Pinterest boards here. Anyways, as much as I pin new recipes, I very rarely go back and try any of the recipes. This past weekend I was looking through my boards and decided to finally try this Peach Lemonade recipe I pinned from Cooking Light. 

If I am not drinking seltzer water, chances are I am drinking lemonade, especially during the summer. I especially love flavored lemonades and this peach version is perfectly sweet and refreshing. I will note that this recipe is a little more involved than other lemonade recipes I have made in the past. Nothing too difficult, but you do need to refrigerate the mixture for at least 3 hours before serving. This Peach Lemonade is definitely worth the extra steps and I can't wait to make it again while fresh peaches are still in season.

Peach Lemonade
Recipe from Cooking Light

4 cups water
2 cups fresh peaches, coarsely chopped
3/4 cup granulated sugar
1 cup fresh lemon juice (about 6 lemons)
4 cups ice
1 peach, putted and cut into wedges

In a medium saucepan set over medium-high heat, combine the water, fresh peaches and granulated sugar. Bring to a boil. Reduce the heat and simmer for 3 minutes. Transfer the mixture to a blender and let stand for 20 minutes. Remove the center piece of the blender in order to allow steam to escape. Place a kitchen towel over the opening. Blend until smooth. Pour the mixture into a large bowl and refrigerate for at least 3 hours.

Pour the mixture through a fine sieve placed over a large bowl. Discard the solids. Add the lemon juice.  Place 1/2 cup ice into each glass and then pour approximately 2/3 cup lemonade into each. Garnish with fresh peach wedges.

Monday, August 5, 2013

My Favorite New York City Bakeries

Back in July Dan and I spent a long weekend in New York City. It has become somewhat of a tradition for us- this is now the fourth year in a row that we have gone. I love walking around the city and of course checking out the local bakeries. After four years of exploration, I finally have a good idea of the best bakeries in the city. Today I am sharing a few of my very favorites with you all.

After checking into our hotel, we immediately headed up to Columbus Circle and stopped at Bouchon Bakery. Bouchon has the best macarons. Now I would choose a chocolate chip cookie over a macaron nine times out of ten, but the vanilla macaron at Bouchon is amazing. I also love the funfetti macaron, a flavor that I tried for the first time on this trip. Dan always orders the homemade Oreo.


Along the way we stopped at Baked by Melissa, a little bakery that sells mini cupcakes. I love the concept behind this bakery- you can easily get your cupcake fix without spoiling your appetite. My favorite is the chocolate chip pancake cupcake. 

Since we were not too far from the Upper West Side, we decided to continue walking and check out Levain Bakery. Levain's location is definitely a little out of the way. I had always wanted to try their cookies, but never made it that far up in previous trips. However, Levain is a must for all cookie lovers- their incredibly thick cookies are worth the long walk.  


Not only are Levain's cookies thick and chewy, but they are served warm and packed with melted chocolate chips. Talk about cookie perfection.


We also had to stop at Magnolia Bakery for some cupcakes. Above is the caramel cupcake that Dan ordered.


Magnolia is probably most famous for their vanilla cupcake with vanilla frosting. So simple, but so good. I also love the simple swirl they do on top of their cupcakes.


My favorite cupcake at Magnolia is the red velvet cupcake. The whipped vanilla frosting is creamy and so, so good.


If I had to pick my favorite treat in New York City, it would definitely be the pretzel croissant from City Bakery. I can't even describe how amazing it is- you just have to go and try it yourself.  


As much as I love re-visiting my favorite bakeries, I also love finding new favorites. On this trip Dan and I went to Chelsea Market for the first time. It is now one of my favorite places in the city.  There are fewer tourists than there are in other parts of the city and I love exploring all of the bakeries and little shops. Whether you are looking for baked goods, fresh cheese, fresh meat, nuts, spices or teas- you will find it all at Chelsea Market. 


I couldn't resist stopping at Eleni's Cupcakes before we left Chelsea Market. I really love Eleni's chocolate cupcake- so moist and delicious!  And how cute are the frosted sugar cookies? You know we had to take home a few to sample. 


On our last day in the city, we stopped at Doughnut Plant for breakfast. Since I somewhat miscalculated its location, it ended up being a long walk to get there. But it was definitely worth the walk.  They have tons of fun flavors to choose from- my favorite is the carrot cake doughnut. 


I seriously wish there was a Doughnut Plant in Boston. The Valhrona Chocolate Doughnut is also really rich and tasty. 


Finally, I need to tell you about Two Little Red Hens, located in the Upper East Side. Although it is a little out of the way, we always find a way to stop there and pick up a chocolate cupcake. It is honestly one of the best cupcakes I have ever had.


So there you have it- my favorite bakeries in New York City. Now you tell me, what are your favorite bakeries in the city?

Sunday, August 4, 2013

French Toast Sticks


Happy Monday everyone! I hope you all had a great weekend. Ours was definitely relaxing and went by way too quickly as always. It was also filled with great food, which makes any day that much better. On Saturday night I tried a new German restaurant with my parents. Although German food is not my favorite, the giant pretzel with spicy apple mustard was a definite highlight of the meal. Today my boyfriend and I took a walk through Boston's North End and came home with a box full of cannolis    from Mike's Pastry. I can hardly wait until dinner is over to dig into my chocolate chip cannoli- definitely one of my all-time favorite desserts.


I also made a few things in my kitchen, including these easy French Toast Sticks. I seriously love French Toast. Most mornings I just eat a simple breakfast- greek yogurt with granola, fresh fruit or cereal with milk. But I am all about indulgent breakfasts on the weekend or vacation and French Toast is at the top of my favorite indulgent breakfast list. These French Toast Sticks are super easy to make and taste so much better than the frozen ones you can buy at the supermarket. Served with fresh fruit and maple syrup, you have yourself a perfect Sunday morning breakfast. You can also freeze the extras and pop them into the microwave for a quick breakfast throughout the week. 

French Toast Sticks
Recipe from Iowa Girl Eats

4 slices thick-cut bread
3 eggs
1/2 cup milk
1 tbsp melted butter, slightly cooled
1 tsp vanilla extract
1/2 tsp ground cinnamon

Preheat the oven to 350 degrees F. Spray a large baking sheet with non-stick cooking spray. Set aside.

Cut bread slices into thirds and set aside.

In a large shallow dish, whisk together the eggs, milk, melted butter, vanilla and ground cinnamon. One at a time, dunk the bread sticks into the egg batter, letting the excess drip off. Place each bread stick onto the prepared baking sheet. Bake for 16-20 minutes or until lightly golden in color. Halfway through the baking time, flip over the bread sticks and spray with the tops again with non-stick cooking spray.

Sprinkle warm french toast sticks with powdered sugar, if desired, and serve.
Related Posts Plugin for WordPress, Blogger...